Table of content:
- Blinkit Seller Panel Overview
- Documentation and Eligibility to Register on Blinkit Seller Panel
- Blinkit Seller Registration Process - Step-by-Step
- Blinkit Seller Login Steps
- Product Categories Available on Blinkit Portal
- Best Practices to Have A Strong Presence On Blinkit
- Benefits to Sell on Blinkit Seller Hub
- Conclusion


Quick commerce, also known as Q-commerce, is a growing trend in today's market. Since customers prioritize fast delivery, this industry is expanding rapidly. According to a Citi report, by the end of FY25, India's quick commerce market is projected to reach $9 billion. It is expected to surpass $26 billion by FY28E, growing at a CAGR of 73%. Three major companies dominate a large share of the quick commerce market: Blinkit, Zepto, and Swiggy Instamart. Blinkit leads with a 41% market share.
Collaboration with Quick Commerce can help increase your sales tremendously and revenues as well. Your products are exposed to millions of customers all over India, and the best thing is that you do not need to compel them to buy.
Are you thinking of expanding your business? If so, then you can sell your products on Blinkit. It is a leading quick commerce platform that connects sellers with millions of customers who are searching for groceries, cake, fresh fruits and vegetables and many more. Becoming the blinkit seller can help businesses to expand their product reach.
Blinkit operates in more than 25 cities in India, such as Delhi, Kolkata, Lucknow, and many more. They currently have around 1,000 dark stores and aim to set up 1,000 more by the end of 2025. Blinkit's dark store is located in key areas, that's why they deliver the products within 10 minutes.
Blinkit provides offers and cashback from time to time. Sellers can utilize these offers and cashback to attract wide customers. Let's discuss this in detail and learn more about the Blinkit seller registration process and its important requirements.
Blinkit Seller Panel Overview
Blinkit's seller panel allows various business owners and retailers to sell their products to a wide number of customers. It will enable sellers to list products, track inventories, manage payments, and much more.
The products are delivered in more than 25 major cities in India. Whenever a customer places an order in Blinkit, the platform will identify the nearest dark store and assign the task to a delivery boy; he will pick up the ordered product and deliver it to the customer. This seamless process delivers the ordered product to customers within 10-30 minutes and enhances customer satisfaction.
Documentation and Eligibility to Register on Blinkit Seller Panel

Eligibility Criteria
- Type Of Business - Your business must be a registered entity to become a seller on Blinkit.
- Products - Blinkit has more than 7000+ product categories. The products sellers will be selling on Blinkit should fall into the categories listed on the platform, such as groceries, packaged food and essentials.
- Location - Blinkit operates in selected cities in India. Your business should be in a Blinkit serviceable area to become a seller on Blinkit.
Documentation
- Goods and service identification number
- PAN card
- Adhar card
- Bank account details
- Trade license
- Drug license (if you are selling pharmaceutical products on Blinkit)
- FSSAI license (if you are selling food products on Blinkit)
Blinkit Seller Registration Process - Step-by-Step
Blinkit is the fastest-growing, quick-commerce company in India. Sellers cannot directly list their products on Blinkit. You need to submit your details, and the Blinkit team will review them. If your products meet their requirements, they will invite you to sell.
1. Visit Blinkit Seller Registration Page
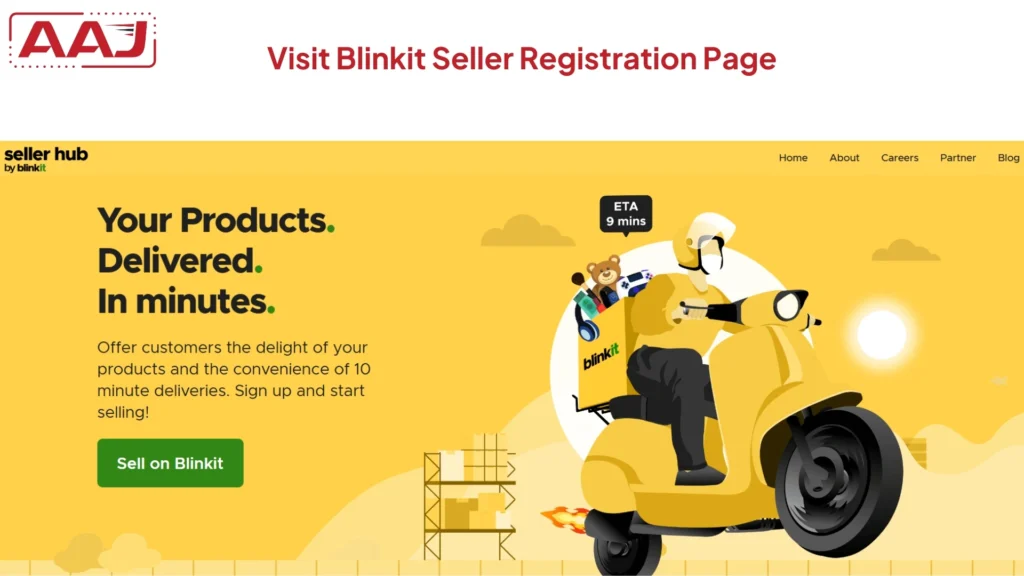
You need to visit the Blinkit registration page https://seller.blinkit.com/ and then click on sell on Blinkit.
You must then provide your Email ID. An OTP will be sent to that Email ID, and you need to enter it. You will be redirected to a Blinkit seller page.
2. Fill Registration Details
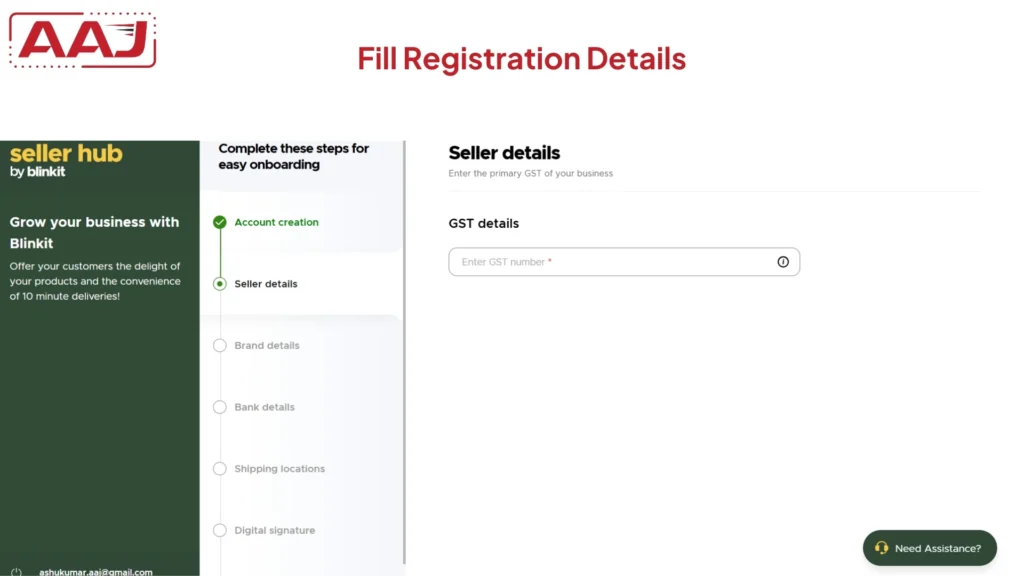
You must provide your GST number, brand details(brand name, trade name), bank details, shipping location and digital signature. You must also provide the necessary documents, such as your PAN card.
3. Fill Personal Details
You need to fill out all the personal details, such as name, address, contact information and product type, that you will be selling on Blinkit.
4. Read the Terms And Conditions
You must then read and understand all the terms and conditions, click the checkbox, and click the submit button. Blinkit will verify all the details you provide.
There is no particular time frame for Blinkit confirmation. However, if you don't get any information from Blinkit within 35-45 days, contact its support care.
Below, we are listing the steps for setting up your Blinkit Seller account
- You will receive a notification if Blinkit approves all the necessary details and documents. You can now access the seller dashboard.
- You have to do product listings and apply for APOB. The product details include brand name, product name, UPC and many more. You need to fill out the category and commercials, category attributes, pricing details, images and videos and click on the submit button. The photos need to be clear and professional and meet Blinkit seller guidelines. Please provide detailed information regarding the product, such as its size, weight, and ingredients.
- You must send your products to the Blinkit warehouse, and from there, they will be dispatched to the Blinkit dark store. So, you need to take the APOB license of the Blinkit warehouse. There are numerous Blinkit warehouse locations, such as Delhi, Gujarat, West Bengal, and many more. You have to select according to convenience and availability. Blinkit also provides a service provider that charges you money for APOB service.
- Your next step is to pay Rs25,000 per product to activate it. The entire amount will be credited to your Blinkit ad account, which you can use to advertise any product on the platform.
Blinkit Seller Login Steps
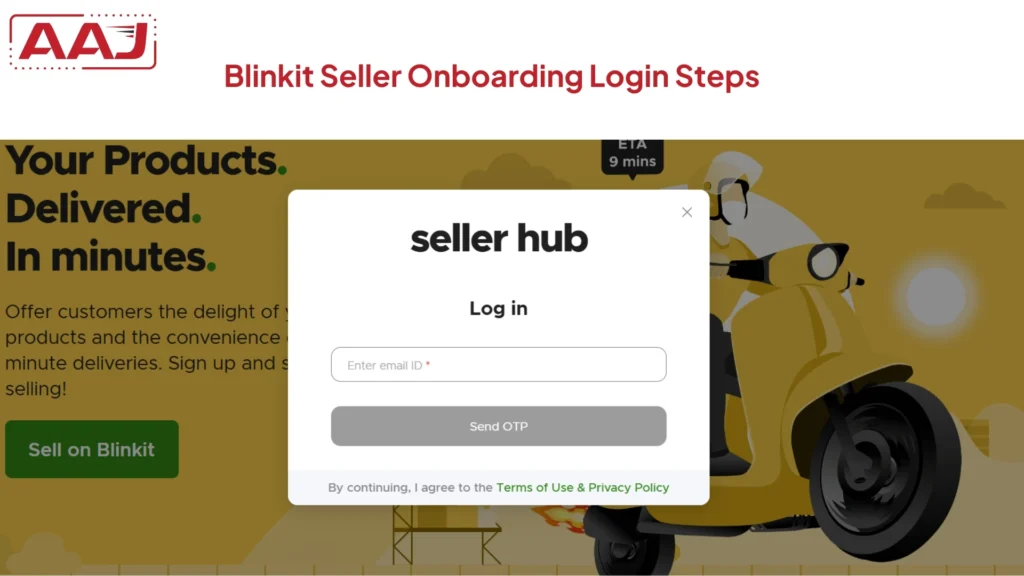
1. Open your browser and type Blinkit seller login or go straight to the website https://seller.blinkit.com/
2. Click the login button and enter your registered email ID and password.
3. You will log in to your seller portal page. On this page, you can track inventories or monitor sales performance. New Blinkit sellers need to update their bank account details, upload necessary documents, and create product listings before they can sell on Blinkit.
How do you add products to the Blinkit seller dashboard?
- Visit the Blinkit seller portal and log in by using the registered email ID and password.
- You will be directed to the Blinkit seller dashboard.
- Click on Add Products and then fill out the basic details about the product. For example, you must write a clear title and then the product category.
- Upload high-quality images of the product.
- You need to mention the weight and dimensions of the product along with the packaging type.
- You have to then click on save and click the submit button.
- Blinkit will verify the product and its details. If Blinkit approves the product, it will be displayed on the platform.
Product Categories Available on Blinkit Portal
- Groceries And Essentials
- Fruits And Vegetables
- Snacks And Package Food
- Beverages
- Dairy And Bakery
- Meat, eggs & Seafood
- Home care & Cleaning
- Personal Care
- Baby care
- Pet Care
- Health And Wellness
- Festive Needs
Best Practices to Have A Strong Presence On Blinkit
You can use some strategies to have a strong presence on the Blinkit seller portal and enable products to reach a vast number of customers.
- Upload products with high-quality images, detailed descriptions and proper keywords.
- Track inventories from time to time and update them if required for timely order fulfillment.
- You should respond to both positive and negative feedback from customers. It helps to build trust in the customer's mind.
- Utilize the promotion tool to gain a wider audience.
- Businesses should invest in featured listening on the Blinkit platform to increase visibility.
- Adhere to the policies and guidelines of the Blinkit seller platform while doing product listings or promotions.
- You can utilize social media to promote your Blinkit products.
- Adjust pricing from time to time to remain competitive in the market.
Benefits to Sell on Blinkit Seller Hub
- You can instantly showcase your products to a large number of customers.
- Customer orders are delivered within 10-30 minutes, and this increases customer satisfaction.
- Blinkit handles inventory management and logistics management, which reduces the seller's operational costs.
- The platform offers discounts and sales from time to time to increase product visibility.
Conclusion
Are you selling your products on brick-and-mortar and thinking of expanding your business? If yes, then you can sell your products through the Blinkit platform. It has various advantages, such as not having to maintain your inventories and logistics. Your product will be instantly visible to millions of customers, and this will increase brand awareness in the market.